
local Seacraft 23 rebuild
4 posters
Page 1 of 1

local Seacraft 23 rebuild
![]() by Admin - Shine Tue Aug 25, 2015 4:40 pm
by Admin - Shine Tue Aug 25, 2015 4:40 pm
Starting this thread for a local customer.....
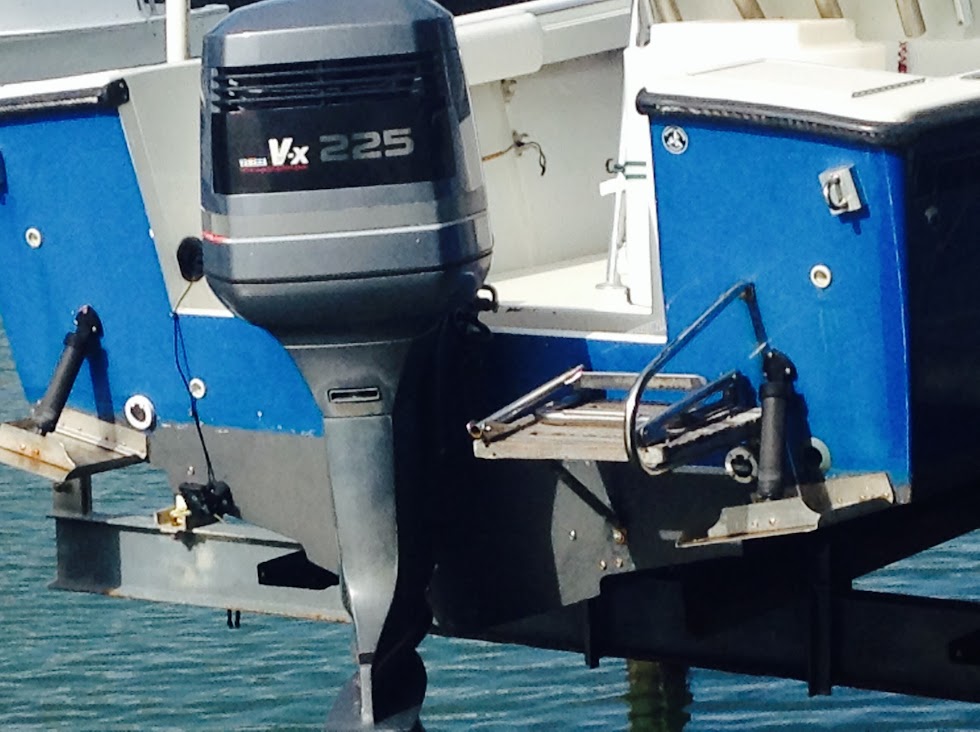
New transom for a seacraft 23.
Can you please post or email some pictures of the transom (need to know what version of the motor-well you have).
Transom core : Assuming outside skin is good: Epoxy in two layers of 3/4" 26 lb foam (I can elaborate on the gluing process if need be).
For inside skin and tabbing: You are looking to build the same inside thickness as was there before, probably 3/16" or close. This equates to 3 to 4 layers of 1708. For tabbing, you can either use 2 layers of 12 oz, 6" biax tape, or one layer of 12" 1708 tape.
Epoxy: Get a combination of slow and tropical (its HOT).
Wood flour and silica to make fillets and glue.
Joel

Admin - Shine- Admin
- Posts : 488
Join date : 2015-03-31 -


Admin - Shine- Admin
- Posts : 488
Join date : 2015-03-31 -
Re: local Seacraft 23 rebuild
![]() by JupSC Wed Aug 26, 2015 12:12 pm
by JupSC Wed Aug 26, 2015 12:12 pm
Joel,
Thanks for putting this up for me. I'll start posting a log as I go. I wanted to get started on it by this week or beginning of next but my focus is now on the storm and preparation for it.
Chris
Thanks for putting this up for me. I'll start posting a log as I go. I wanted to get started on it by this week or beginning of next but my focus is now on the storm and preparation for it.
Chris
JupSC- Posts : 8
Join date : 2015-08-25
Re: local Seacraft 23 rebuild
![]() by DAYTRIP Wed Aug 26, 2015 12:18 pm
by DAYTRIP Wed Aug 26, 2015 12:18 pm
Hey Chris. Good luck! How thick is the transom on the bracket? Just curious.
DAYTRIP- Posts : 133
Join date : 2015-04-14
Re: local Seacraft 23 rebuild
![]() by JupSC Wed Aug 26, 2015 6:09 pm
by JupSC Wed Aug 26, 2015 6:09 pm
Day trip,
Thanks, Roughly 3" on the motor mount for the bracket.
Thanks, Roughly 3" on the motor mount for the bracket.
JupSC- Posts : 8
Join date : 2015-08-25
Re: local Seacraft 23 rebuild
![]() by Admin - Shine Wed Aug 26, 2015 9:03 pm
by Admin - Shine Wed Aug 26, 2015 9:03 pm
JupSC wrote:Joel,
Thanks for putting this up for me. I'll start posting a log as I go. I wanted to get started on it by this week or beginning of next but my focus is now on the storm and preparation for it.
Chris
storm ?
Admin - Shine- Admin
- Posts : 488
Join date : 2015-03-31 -
Re: local Seacraft 23 rebuild
![]() by Cracker Larry Thu Aug 27, 2015 10:33 am
by Cracker Larry Thu Aug 27, 2015 10:33 am
Erica. She's got Savannah, GA written all over her. Tuning up the generator today.
Cracker Larry- Posts : 45
Join date : 2015-04-18
Re: local Seacraft 23 rebuild
![]() by Admin - Shine Thu Aug 27, 2015 12:42 pm
by Admin - Shine Thu Aug 27, 2015 12:42 pm
Cracker Larry wrote:Erica. She's got Savannah, GA written all over her. Tuning up the generator today.
thats what I told my mother! If HHI/SAV ever gets hit, I think it will be one like this that sneaks in from the south. I cant imagine how much water will be pushed up that shallow continental shelf

I was very lucky that before we bought our house, the previous owner put in a 17kw unit. Tested it yesterday.....
https://goo.gl/photos/A7jicnfFXg17h8Ky5
Admin - Shine- Admin
- Posts : 488
Join date : 2015-03-31 -
Re: local Seacraft 23 rebuild
![]() by JupSC Thu Aug 27, 2015 3:09 pm
by JupSC Thu Aug 27, 2015 3:09 pm
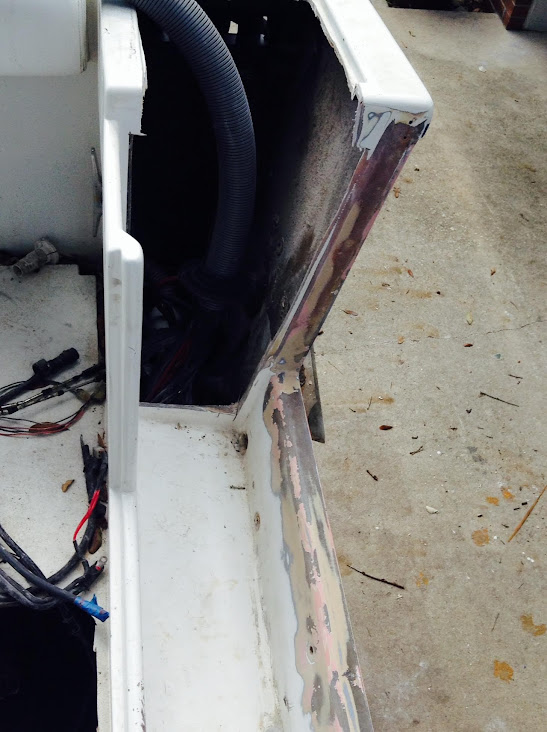
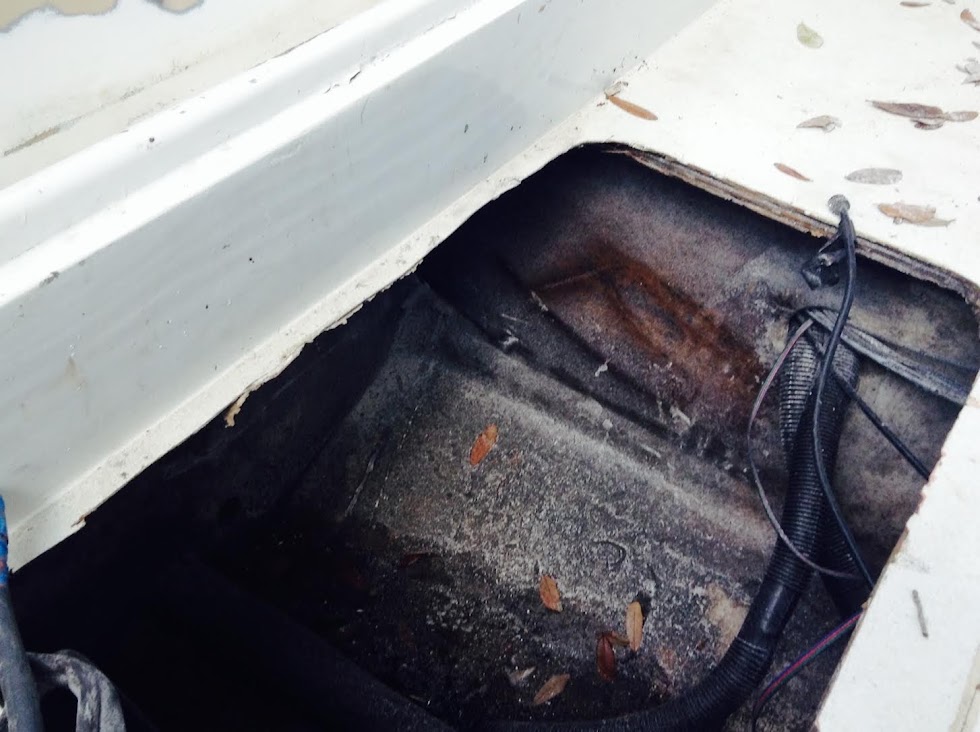
Joel, well I cut the transom in floor live well out to get a better look at the stringers and transom. It looks great and the stringers were definitely redone properly. I contacted don Herman and he reassured me that bolting the bracket to the current transom and then filling in the notch would definitely yield a satisfactory result. So my question to you is my transom is marine ply, should I use marine ply to fill in the notch? I would think that if the materials were similar they would flex the same and be less likely to crack.
JupSC- Posts : 8
Join date : 2015-08-25
Re: local Seacraft 23 rebuild
![]() by Admin - Shine Fri Aug 28, 2015 8:31 am
by Admin - Shine Fri Aug 28, 2015 8:31 am
JupSC wrote:Joel, well I cut the transom in floor live well out to get a better look at the stringers and transom. It looks great and the stringers were definitely redone properly. I contacted don Herman and he reassured me that bolting the bracket to the current transom and then filling in the notch would definitely yield a satisfactory result. So my question to you is my transom is marine ply, should I use marine ply to fill in the notch? I would think that if the materials were similar they would flex the same and be less likely to crack.
Thats good news, will save you some work and money. Yes, you can fill the cut out with plywood, we can make it so its stronger than original. We just need to decide how we will tie it all together. I would definitely remove the rear section of cap first, then you will be able to glass it (the fill piece) all the way across from the inside. After putting in the fill section and perhaps tying it into the stringers (if there is room) you will put then build the transom enclosure. Most guys like to use the boxes and the cap that is there already and simply extend the cap across. The only issue with that is it will leave a flat section in the cap, not really a "problem" it makes putting a hatch there a lot easier. The cap section with the boxes is not cambered/curved. Hope that makes sense. I can make a drawing if not.
Admin - Shine- Admin
- Posts : 488
Join date : 2015-03-31 -
Re: local Seacraft 23 rebuild
![]() by Admin - Shine Tue Sep 01, 2015 7:17 am
by Admin - Shine Tue Sep 01, 2015 7:17 am
more pictures


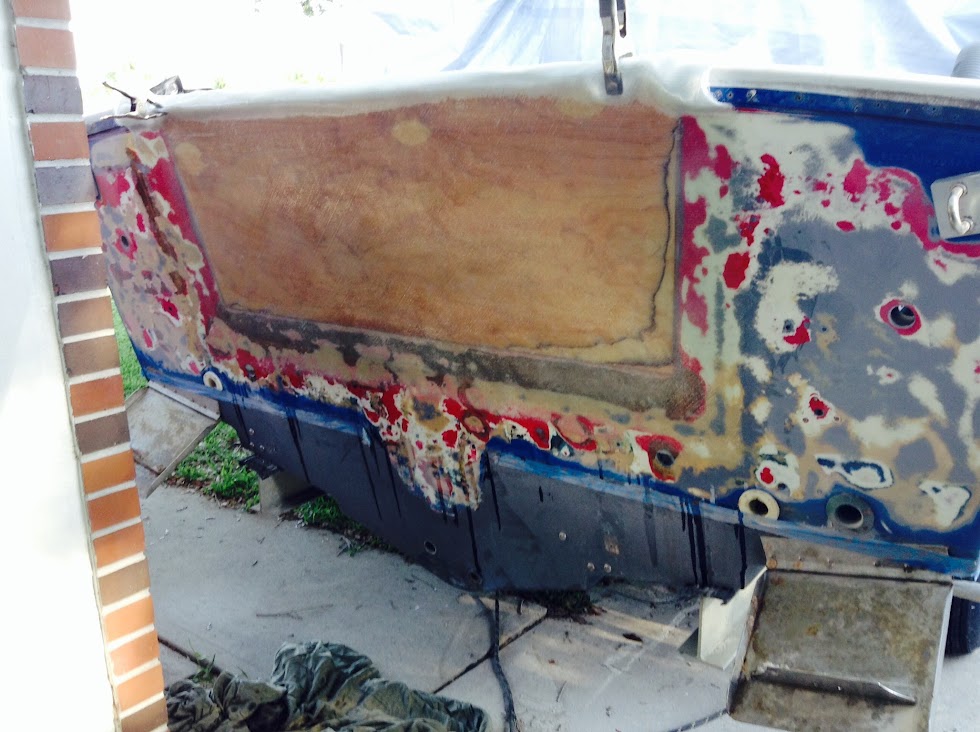
Chris wants to enclose the transom for a bracket.
Next you need to decide if your goinf to keep that bulkhead in the same place a or move it forward. In order to get good working room for glassing in the new transom you will need to cut it back anyway. Either way, the materials are the same.
2 x 3/4" plywood across the transom, glassed in with 3 layers (maybe 4 depending on thickness) of 1708. For tabbing, we can go with one layer of 1708 or two layers of 12 oz tape. In this case, I would probably do the tabbing before the wide cloth (1708), just so you have a nice radius to lay the wide cloth overtop. We have 1708 tape in 12" width for this purpose. glue and fillets will be made of wood flour or a combination of wood flour and silica.
After you have the new transom in with new inside skin, you will put the cap and bulkhead back in. How you do this will depend again if you want to move that bulkhead up. If you keep it in its current location, it will make putting things back together a lot easier as you just replace it where it was and fill the cut out with a piece of plywood (glassed in of course). If you want to move it forward to make more room for storage and rigging, then you will just make a new bulkhead from marine ply.
To get going you will need the following to install the new transom for your seacraft:
wide cloth: 10 yards 1708
tabbing: 5 yards 1708 12" tape, or 10 yards 12 oz 6" tape
filler for glue and fillets: 5 lb wood flour, 8 oz silica
6 gallons epoxy, I would recommend splitting the hardener between slow and tropical speeds
There should be some epoxy and a little 1708 left over from this that you can use later, but it ensures you have enough for this stage.
Once you decide how you want to have your bulkhead enclosure set up, we can go from there.
Joel
Admin - Shine- Admin
- Posts : 488
Join date : 2015-03-31 -
Re: local Seacraft 23 rebuild
![]() by JupSC Thu Sep 03, 2015 10:32 am
by JupSC Thu Sep 03, 2015 10:32 am
Joel,
I'd like to stop by the store tomorrow morning to pick up the epoxy and cloth, possibly around 9. I can give you a call to confirm if you want.
Thanks,
Chris
I'd like to stop by the store tomorrow morning to pick up the epoxy and cloth, possibly around 9. I can give you a call to confirm if you want.
Thanks,
Chris
JupSC- Posts : 8
Join date : 2015-08-25
Re: local Seacraft 23 rebuild
![]() by Admin - Shine Thu Sep 03, 2015 10:44 am
by Admin - Shine Thu Sep 03, 2015 10:44 am
Hi Chris, no problem to pick up tomorrow. You can either enter your order through the website, or call me and I will enter it so that I can have it all ready for you. Joel
Admin - Shine- Admin
- Posts : 488
Join date : 2015-03-31 -
Re: local Seacraft 23 rebuild
![]() by JupSC Mon Sep 21, 2015 6:28 pm
by JupSC Mon Sep 21, 2015 6:28 pm
Hey guys I've been dodging rain clouds and getting a bit of work done. I guess I'm ready to fair the transom, then make the bulkhead and rigging boxes for the transom along with the cap. Pics should be up soon.
JupSC- Posts : 8
Join date : 2015-08-25
Re: local Seacraft 23 rebuild
![]() by Admin - Shine Mon Sep 21, 2015 9:10 pm
by Admin - Shine Mon Sep 21, 2015 9:10 pm
Hey Chris,
Rain has been crazy!
here are the pictures....

A 2 quart kit should be plenty, but it depends how much of it you sand off.
I used a piece of 1/2 ply for the top, I then epoxy glued a strip of 1/4" ply to make the edge, then rounded it over to match the radius of the existing cap, then covered it with a layer of cloth - it blended in pretty well.
here are some pictures of that piece being made and going in, before its glassed to the old cap..


Rain has been crazy!
here are the pictures....
How much primer will i need for the transom?
A 2 quart kit should be plenty, but it depends how much of it you sand off.
To make the cap for the transom did you use a mold or cut plywood and laminate?
I used a piece of 1/2 ply for the top, I then epoxy glued a strip of 1/4" ply to make the edge, then rounded it over to match the radius of the existing cap, then covered it with a layer of cloth - it blended in pretty well.
here are some pictures of that piece being made and going in, before its glassed to the old cap..
Admin - Shine- Admin
- Posts : 488
Join date : 2015-03-31 -
» 23 Seacraft rebuild, Charleston SC
» 23 Seacraft rebuild, scepter to open fisherman
» Another Seacraft Project
» Cobia Rebuild
» Formula 233 rebuild
» 23 Seacraft rebuild, scepter to open fisherman
» Another Seacraft Project
» Cobia Rebuild
» Formula 233 rebuild
Page 1 of 1
Permissions in this forum:
You cannot reply to topics in this forum