
Formula 233 rebuild
Page 1 of 2 • 1, 2 ![]()

Formula 233 rebuild
![]() by Picknasty Sun Aug 23, 2015 1:52 am
by Picknasty Sun Aug 23, 2015 1:52 am


Picknasty- Posts : 19
Join date : 2015-08-20
Re: Formula 233 rebuild
![]() by DAYTRIP Mon Aug 24, 2015 7:50 am
by DAYTRIP Mon Aug 24, 2015 7:50 am
DAYTRIP- Posts : 133
Join date : 2015-04-14
Re: Formula 233 rebuild
![]() by Admin - Shine Mon Aug 24, 2015 7:57 am
by Admin - Shine Mon Aug 24, 2015 7:57 am
The plan so far is to keep it a cuddy and go with a single 300 off a floatation bracket. I will be using epoxy and marine ply for the rebuild.
Keeping the cuddy will save you a lot of time - not having to rework the cap/deck. Thanks for posting, and I am happy to help with technical questions.
Depending on the shape of the stringers, you might not have to replace them.
Joel

Admin - Shine- Admin
- Posts : 488
Join date : 2015-03-31 -

Re: Formula 233 rebuild
![]() by Picknasty Tue Aug 25, 2015 1:34 am
by Picknasty Tue Aug 25, 2015 1:34 am
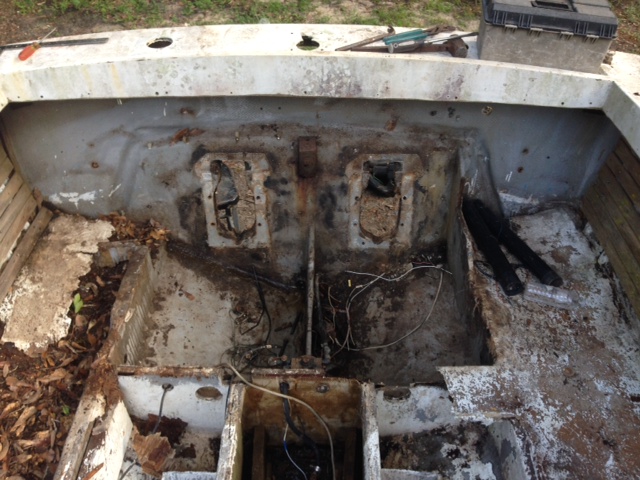
I wish it were that easy. Unfortunately the stringers are shot and the old core from the cap has separated and delaminated. The cap will need to be turned and recored in the cuddy area as well as added stiffeners. The top of the cap flexes pretty badly as it is right now and the old core for the cap has long since rotted away. I will get some pictures of the underside of the cap and post.
As for my first order of business, the transom. I have really been putting in the time to do my homework on this so I'd like to jot down what I have so far and see what you guys think.
Preparation of the bump out core
1.) Use cardboard to make a template of bump out and cut three pieces of marine ply (1/2", 3/4", 1/2") and dry fit them into place.
2.) Coat the sides of each layer of plywood that will bond to another layer with 3 coats of epoxy resin, while still tacky sandwich them together using epoxy thickened with cabosil to the consistency of mayonnaise. Clamp and let cure.
Question: should I use a layer of cloth in between layers of plywood or will thickened epoxy work just fine for bonding?
Preparation of Transom skin
1.) Clean out old transom core material and sand smooth with 80grit paper.
2.) Prepare and patch old I/O holes using the techniques described by West Systems at this address
and part 2 here
.
3.) Cover entire transom, both curved and bump out portions, with 2 layers of biax (1700 or 1708?)
4.) While waiting for the newly applied skin to tack up, I can coat the bump out core with 3 layers of epoxy and let tack.
5.) While bump out portion is still tacky coat area with epoxy thickened with cabosil to a mayonnaise consistency and fit the new bump out core into place and clamp together
6.) After bump out core has bonded to the skin, fillet and tab in with a 12" biax tape (1708 or 1700?) and then again with a 6" biax tape. Then wet out and cover with two layers of biax cloth across entire bump out, first layer staggering in between the two tape tabs and the second layer extending at least 2" beyond first biax tape layer. This essentially encasing my new bump out core in good, tough glass.
My particular 233 had a balsa core on the curved portion of the transom as well. I have talked to a few other guys who restored their 233 and some seem to have that extra transom core and some don't, strange. I would like to go back with two sheets of 1/4" marine ply at this location one at a time to conform to the curve of the transom and two give it a little more stiffness in the back and to also better support the transom D bolts.
At this point I would like to
1.) Sand the curved portion of the transom and trace what would need to go in that area and NOT overlap the bump out portion.
2.) Coat bonding surface of 1/4" marine ply with 3 coats of epoxy and when it become tacky, coat curved portion of transom with epoxy thickened with cabosil to a mayo consistency and bolt the first 1/4" to curved portion of transom.
3.) After it cures basically do the same with the next layer of 1/4" marine ply by sealing bonding surfaces with 3 coats of epoxy resin and then joining with thickened epoxy while still tacky.
4.) Then fillet and tab in by the same fashion as described in step 6 above.
So a few questions. I have read many posts about not using epoxy with 1708, especially on vertical surfaces, horizontal surfaces tend to perform a little better, due to the styrene-soluble binder and if binder is absent and the 3/4 oz mat is stitched than this is better but it is still sometimes problematic to wet out completely. I have seen a few recommendations (Joel I think you stepped in on a screamandfly website or something like it) for using a biax cloth with not mat back for two layers instead of a single layer of 1708. If I am on the right track about using a biax cloth without mat (say maybe 1700, this is a E glass correct?) what specific weight and type should I go with? Also should I be joining my marine ply pieces with only thickened epoxy or would it be beneficial to use a layer of cloth in between as well? Lastly what is the best way to sandwich my new core to the outter transom skin? 2x4s on the outside of the transom bolted through to 2x4s on the inside of the transom? If I go this route can I patch those holes with thickened epoxy and it not be a major concern for future water intrusion? Is there a better way? I know this has been a lengthy post but I want to do this rebuild right and strong. Thank you for taking the time to help me out.
Matt
Picknasty- Posts : 19
Join date : 2015-08-20
Re: Formula 233 rebuild
![]() by Admin - Shine Tue Aug 25, 2015 9:46 am
by Admin - Shine Tue Aug 25, 2015 9:46 am
I wish it were that easy. Unfortunately the stringers are shot and the old core from the cap has separated and delaminated. The cap will need to be turned and recored in the cuddy area as well as added stiffeners. The top of the cap flexes pretty badly as it is right now and the old core for the cap has long since rotted away. I will get some pictures of the underside of the cap and post.
Well, at least you know what your getting into
Preparation of the bump out core
1.) Use cardboard to make a template of bump out and cut three pieces of marine ply (1/2", 3/4", 1/2") and dry fit them into place.
2.) Coat the sides of each layer of plywood that will bond to another layer with 3 coats of epoxy resin, while still tacky sandwich them together using epoxy thickened with cabosil to the consistency of mayonnaise. Clamp and let cure.
Question: should I use a layer of cloth in between layers of plywood or will thickened epoxy work just fine for bonding?
No need for three coats of epoxy between plywood layers, just one coat of un-thickened (neat) epoxy, then epoxy glue (epoxy plus wood flour mixed to ketchup consistency). Also, no need for glass between layers when using epoxy resin - thats only necessary with polyester/vinylester.
I would epoxy in the first layer with thick epoxy putty (brush on neat epoxy on both gluing surfaces first), let the first layer set up strong, then epoxy glue the next layers using drywall screws to hold the pieces while the epoxy kicks. The screws come out, they are only there as "clamps", and they give a very uniform pressure compared to trying to clamp in such a difficult position.
once your bump out core is all set up and flush with the transom, you will cover with glass. I would use 2 layer of 1708 and I would carry it all the way to the edge of the transom and bottom.
My particular 233 had a balsa core on the curved portion of the transom as well. I have talked to a few other guys who restored their 233 and some seem to have that extra transom core and some don't, strange. I would like to go back with two sheets of 1/4" marine ply at this location one at a time to conform to the curve of the transom and two give it a little more stiffness in the back and to also better support the transom D bolts.
With outboards, it will be absolutely required to re-core the whole transom. I would layer in 1/4" ply (glued the same way the bump out core). Then for the new inside skin. two layers 1708. First layer overlaps the sides/bottom with at least 6", the second layer overlaps by at least 8". Then you run another layer of "tabbing" over top of this joint - one layer 1708, 12" wide. This is a little opposite from what you might read elsewhere but with epoxy the order of the tabbing does not matter (because of bonding ability of epoxy) and this way will save you a ton of fairing time.
I started stocking 1708 cut into 12" tape just for this reason...
After all of this, then fill the i/o hole. Grind back the edge of the glass to approximately 12/1 bevel - anything close will work. Layer in the 1708 to fill the hole and overlap a little around the bevel. It does not matter if you lay in the big of smaller pieces first. Sand and fair.
So a few questions. I have read many posts about not using epoxy with 1708, especially on vertical surfaces, horizontal surfaces tend to perform a little better, due to the styrene-soluble binder and if binder is absent and the 3/4 oz mat is stitched than this is better but it is still sometimes problematic to wet out completely. I have seen a few recommendations (Joel I think you stepped in on a screamandfly website or something like it) for using a biax cloth with not mat back for two layers instead of a single layer of 1708.
In this case you get plenty of strength from the "17" part, the mat is extremely helpful in allowing the new layers of glass to conform to the uneven surface of your boat. It makes the bond and quality of lamination much better. If you were working with a brand new surface/mold then it might make sense to use two layers of baix with no mat - IF your interested in double the work
second reason to use 1708 over two layers of 1700 - You need to build thickness, and 1708 is more than twice the thickness of two layers of 1700. Its just a ton of unnecessary work to use 1700.
The 1708 we stock wets out 100% with epoxy. here is a link to the [url=http://www.gulfstreamcomposites.com/product-p/lmh_biax_1708_yard.htm]1708, you can see by the pictures how well it wets out and conforms to turns
http://www.gulfstreamcomposites.com/product-p/lmh_biax_1708_yard.htm
If I am on the right track about using a biax cloth without mat (say maybe 1700, this is a E glass correct?) what specific weight and type should I go with?
Its all E-glass. S-glass is more expensive than carbon fiber
Also should I be joining my marine ply pieces with only thickened epoxy or would it be beneficial to use a layer of cloth in between as well?
Right, no glass between layers of core when using epoxy.
Lastly what is the best way to sandwich my new core to the outter transom skin?
If you go with the way I describe above, you just need to use a 2x4 as a backer for the screws on the first layer. Actually you do not even need that, if you let you epoxy coating (pre-coating of gluing surfaces) tack up, then mix a thicker glue (peanut butter consistency), you can just push that first piece into place. Make sure you push it in there with enough force to squeeze out excess glue.
If I go this route can I patch those holes with thickened epoxy and it not be a major concern for future water intrusion? Is there a better way?
its no worry at all, when you fill the i/o bump with new glass (at the end) its going to cover any holes.
I know this has been a lengthy post but I want to do this rebuild right and strong. Thank you for taking the time to help me out.
I can tell you have done your homework !
for the epoxy, get a mix of hardener speeds, but be sure to get at least a little of the tropical hardener. The tropical is very, very handy for big gluing and laminating jobs.
Admin - Shine- Admin
- Posts : 488
Join date : 2015-03-31 -
Re: Formula 233 rebuild
![]() by Admin - Shine Tue Aug 25, 2015 10:33 am
by Admin - Shine Tue Aug 25, 2015 10:33 am
1708 50" wide http://www.gulfstreamcomposites.com/product-p/lmh_biax_1708_yard.htm
1708 12" tape http://www.gulfstreamcomposites.com/product-p/lhm_biax_db1708_12in_yard.htm
Epoxy. (you can select a mix of hardener speeds).. http://www.gulfstreamcomposites.com/category-s/129.htm
Fillers, you will need wood flour and silica. Eventually you will want some fairing filler too....
http://www.gulfstreamcomposites.com/category-s/113.htm
Admin - Shine- Admin
- Posts : 488
Join date : 2015-03-31 -
Re: Formula 233 rebuild
![]() by Picknasty Fri Aug 28, 2015 10:31 pm
by Picknasty Fri Aug 28, 2015 10:31 pm
Thank you very much for setting me straight on all this, I will be buying my resin system, fillers and glass from you. I have to finish one or two more brick floor jobs before I will have the last little bit I need to make the purchase but when I do I will give you a shout and get the order in.
Right now the progress is slow but I go out to the boat in the afternoon for 30-40 minutes and chip some more of the old core away with a 1.5" wood chisel and a rubber mallet, it does a pretty good job of getting the old nasty stuff off. I'd like to take the cap off soon to get the last remnants of the inner woven roving skin off the hull and finish the prep work without being encumbered. I have been cautioned though that this might introduce some bow to the hull and I would definitely like to avoid that. What would be the recommended way of properly supporting the hull during this phase and removal of the stringers?
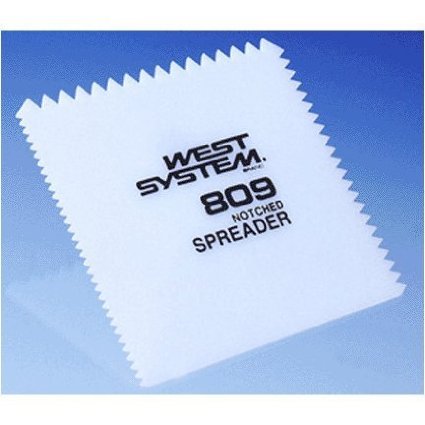
When I lay down the thickened epoxy for the first layer of the bump fill to the outer transom skin, should I use a spreader like the one below?
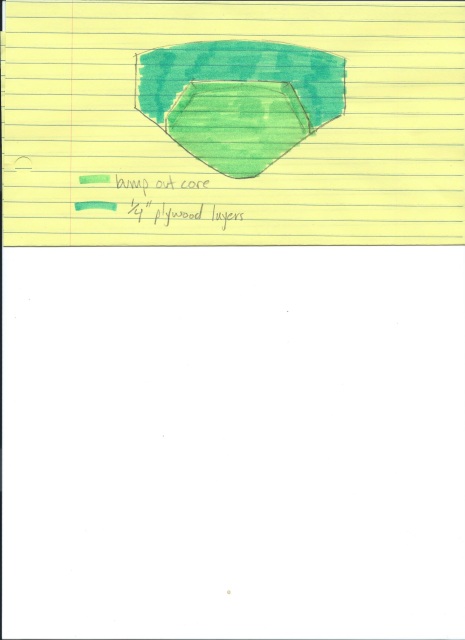
Just so I make sure I'm on the same page, when I come back to core the rest of the transom it will NOT overlap the bump out like the OCD illustration I have attached...correct? Thanks again!
Picknasty- Posts : 19
Join date : 2015-08-20
Re: Formula 233 rebuild
![]() by DAYTRIP Sun Aug 30, 2015 8:49 am
by DAYTRIP Sun Aug 30, 2015 8:49 am
DAYTRIP- Posts : 133
Join date : 2015-04-14
Re: Formula 233 rebuild
![]() by Admin - Shine Sun Aug 30, 2015 10:30 am
by Admin - Shine Sun Aug 30, 2015 10:30 am
You should overlap the layers of 1/4" over the bump out - full pieces. You need at least 1.5" of core material on a boat of this size/power. Build the bump out so its level (or just shy of level) with the rest of the transom. The forces on the transom with an outboard on a bracket are different than the i/o set up
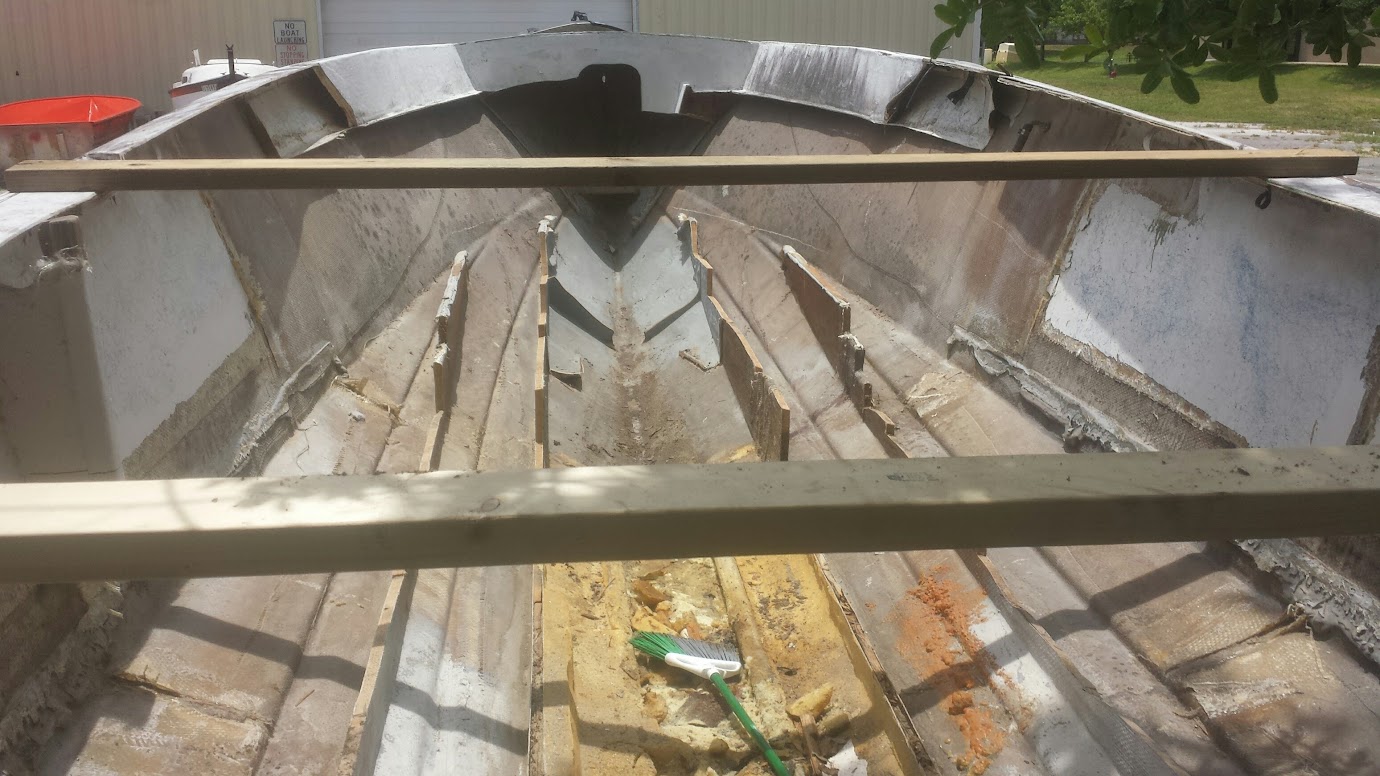
Put a couple 2x4's across the gunnels before you remove the rear cap, it will keep the hull from twisting.
like this
Admin - Shine- Admin
- Posts : 488
Join date : 2015-03-31 -
Re: Formula 233 rebuild
![]() by Picknasty Tue Sep 01, 2015 2:32 pm
by Picknasty Tue Sep 01, 2015 2:32 pm

Picknasty- Posts : 19
Join date : 2015-08-20
Re: Formula 233 rebuild
![]() by Admin - Shine Wed Sep 02, 2015 4:42 pm
by Admin - Shine Wed Sep 02, 2015 4:42 pm
Admin - Shine- Admin
- Posts : 488
Join date : 2015-03-31 -
Re: Formula 233 rebuild
![]() by Picknasty Thu Sep 10, 2015 11:44 pm
by Picknasty Thu Sep 10, 2015 11:44 pm


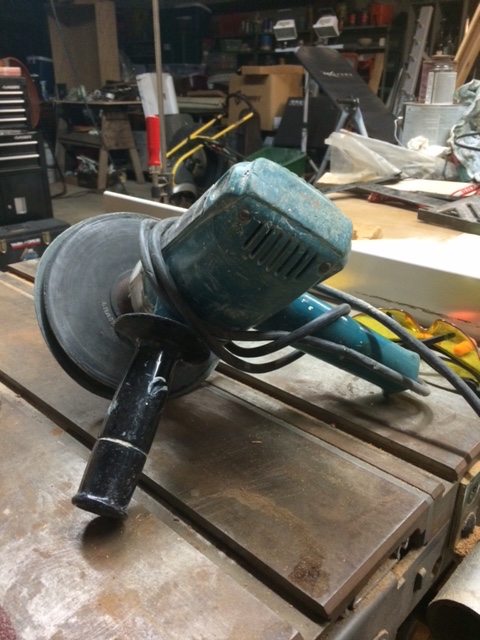
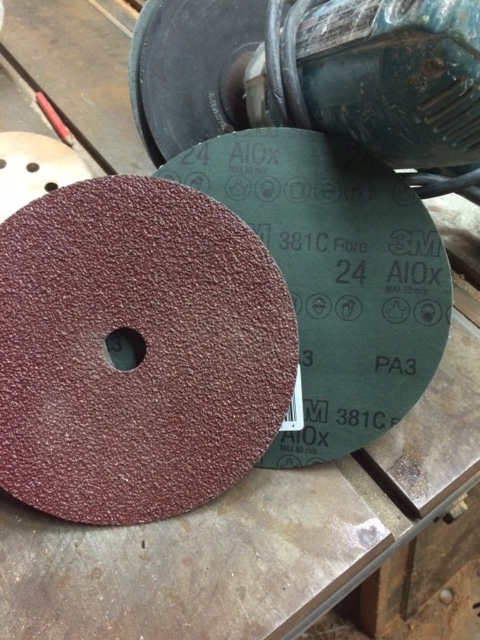
My current weapon of choice for doing this terrible work.
Picknasty- Posts : 19
Join date : 2015-08-20
Re: Formula 233 rebuild
![]() by Admin - Shine Fri Sep 11, 2015 8:37 am
by Admin - Shine Fri Sep 11, 2015 8:37 am
From what I can see it looks ground down enough. I recommend spreading a thin epoxy putty over any depressions that the first layer of glass will not conform too, otherwise you get air pockets. Mix epoxy and wood flour until its the consistency of ketchup, spread it thin to fill and even out the grind gouges and uneven glass. Do this an hour or so before the first layer of 1708, that way it cures together and it still malleable enough to conform under the laminating roller
Admin - Shine- Admin
- Posts : 488
Join date : 2015-03-31 -
Re: Formula 233 rebuild
![]() by Admin - Shine Fri Sep 11, 2015 8:39 am
by Admin - Shine Fri Sep 11, 2015 8:39 am
Admin - Shine- Admin
- Posts : 488
Join date : 2015-03-31 -
Re: Formula 233 rebuild
![]() by Picknasty Sat Sep 12, 2015 3:37 am
by Picknasty Sat Sep 12, 2015 3:37 am
Picknasty- Posts : 19
Join date : 2015-08-20
Re: Formula 233 rebuild
![]() by Picknasty Tue Sep 29, 2015 11:18 pm
by Picknasty Tue Sep 29, 2015 11:18 pm
Picknasty- Posts : 19
Join date : 2015-08-20
Re: Formula 233 rebuild
![]() by Admin - Shine Wed Sep 30, 2015 7:31 am
by Admin - Shine Wed Sep 30, 2015 7:31 am
but should I fair out these areas with epoxy with a thickening agent to give a nice flush surface for better bonding of my glass?
No, you want glass to glass bond, however, if the dips or gouges from the grinder will cause air paocket under the glass layup, then it better to fill them with epoxy/milled fibers first.
a top layer of bilge paint, some fine mesh cloth, CSM, then two layers of roven woven. After all this I seemed to be down the the layers that were laid on the initial layup of the hull.
That is a lot. They have been counting much of that glass as the hull glass, not just stringer glass and tabbing. If it was glassed all the way across as you describe, then its not just tabbing you removed. I am concerned that you now have too thin of a hull skin. Can you measure this please?
Should the new glass and tabbing be enough to makeup for any over zealous sanding work?
Sure, but its better to nto have the extra work and expense if its not necessary.
I'll try and post some pictures soon.
That is definitely a good idea, pictures are work more than a thousand words.
Admin - Shine- Admin
- Posts : 488
Join date : 2015-03-31 -
DAYTRIP- Posts : 133
Join date : 2015-04-14
Re: Formula 233 rebuild
![]() by Picknasty Wed Sep 30, 2015 1:19 pm
by Picknasty Wed Sep 30, 2015 1:19 pm
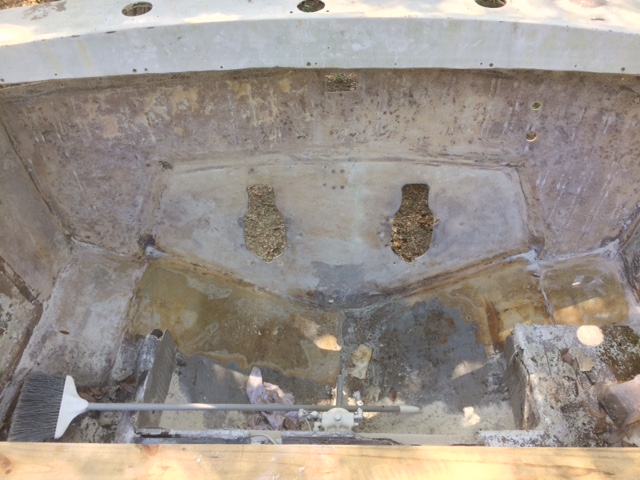
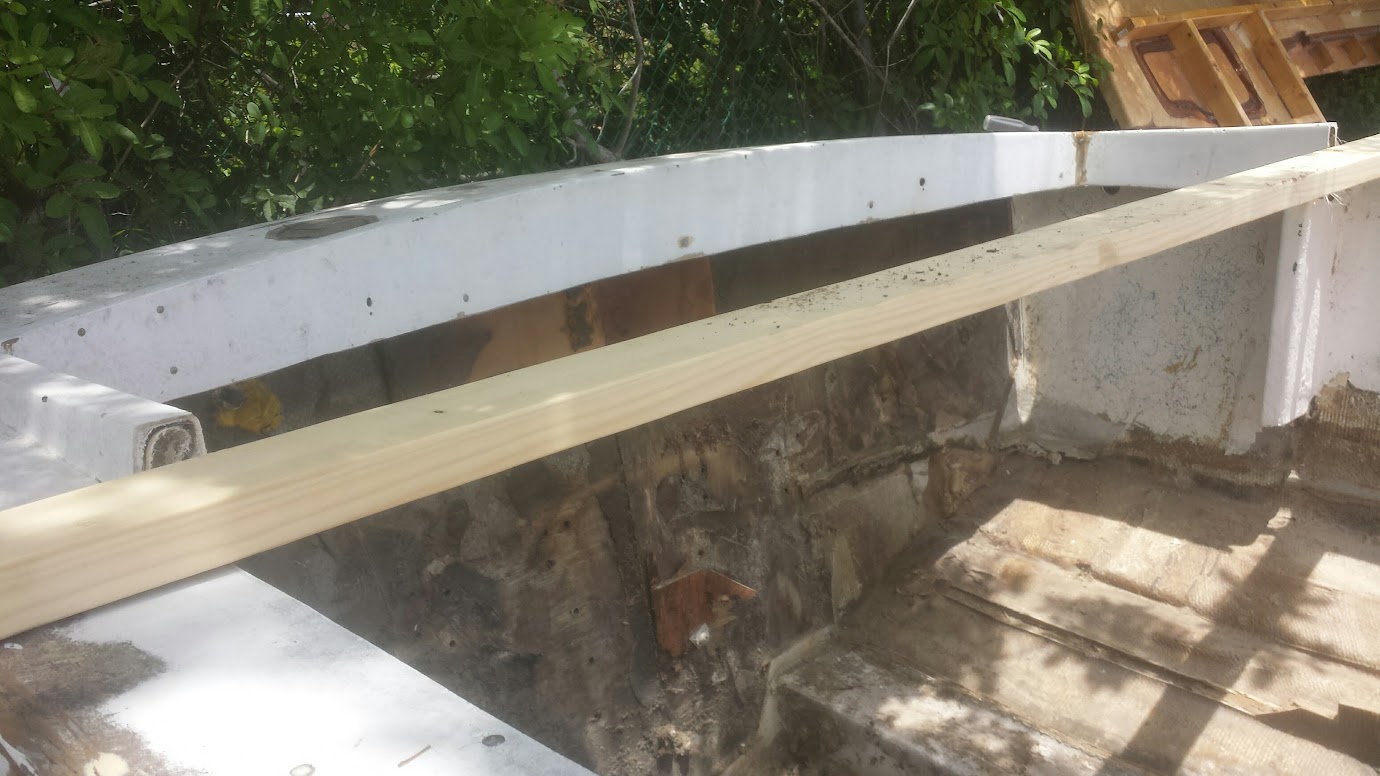
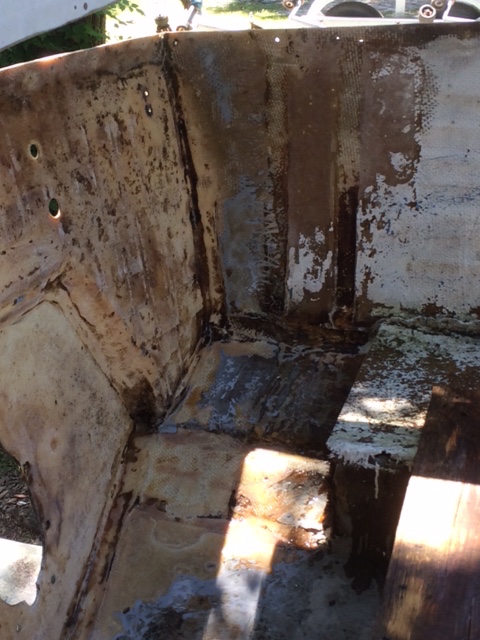
Here is a view of the port side, the thick line of resin was the attachment of the old stringer.
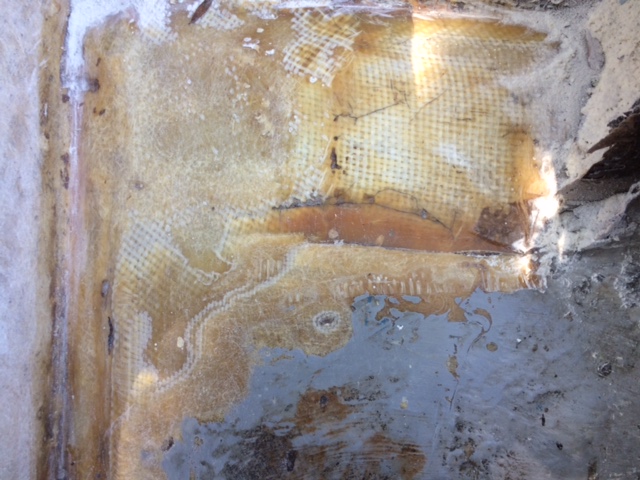
Here is a good shot of all the layers as the build up

Starboard side
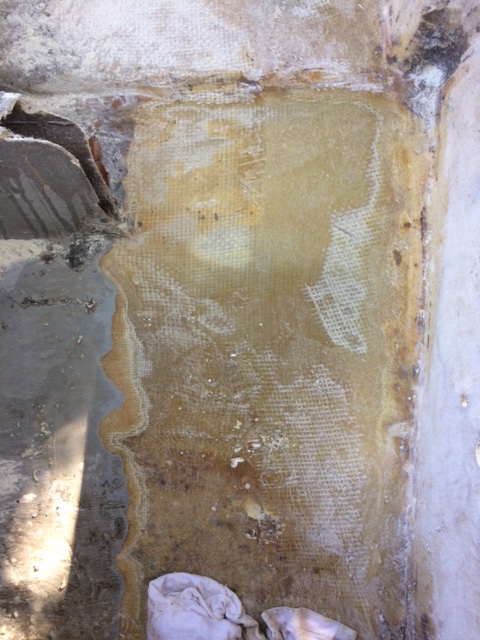
Here is a closer look at the port stringer and the glass overlay. Seems to be the two layers of woven roven extending out in both directions

And here is the last little pic of the lip around the bottom of the bump out
So what is the recommendation from here? Whatever I need to do, I just want to do it right. Thanks for taking the time to instruct Joel. And yes, very very itchy!
Picknasty- Posts : 19
Join date : 2015-08-20
Re: Formula 233 rebuild
![]() by Picknasty Mon Oct 05, 2015 9:04 pm
by Picknasty Mon Oct 05, 2015 9:04 pm
Picknasty- Posts : 19
Join date : 2015-08-20
Re: Formula 233 rebuild
![]() by DAYTRIP Mon Oct 05, 2015 9:33 pm
by DAYTRIP Mon Oct 05, 2015 9:33 pm
DAYTRIP- Posts : 133
Join date : 2015-04-14
Re: Formula 233 rebuild
![]() by Picknasty Mon Oct 05, 2015 11:46 pm
by Picknasty Mon Oct 05, 2015 11:46 pm
DAYTRIP wrote:It's not too much till you see what's outside the boat. You can always Just add back a couple layers of 1708. Joel is the master
Thanks! This is my first project like this and I'm learning so much as I progress through. I really enjoy this project and working to bring something like this back. I just want to make sure I get it right and have a solid platform to make what sometimes will be long runs.
Picknasty- Posts : 19
Join date : 2015-08-20
Re: Formula 233 rebuild
![]() by Admin - Shine Tue Oct 06, 2015 7:35 am
by Admin - Shine Tue Oct 06, 2015 7:35 am
Looking at the pictures, I am pretty certain you are good to go without adding more thickness first (besides what your going to get anyway from the transom overlaps). The new transom skins overlap up the sides and bottom. Use our 1708, its takes turns very well and will build thickness.
going forward: Normally I tell people that they need to remove the entire stringer and its tabbing so that their new stringers are bonded to the hull itself. If your formula is as well constructed as the one I tore apart, then I might reconsider this. The stringer tabbing on the formula I had was very well attached, it was probably done in the same time window as the hull laminate, it was difficult to peel. Not having to remove all the tabbing would be a huge time saver too.
Admin - Shine- Admin
- Posts : 488
Join date : 2015-03-31 -
Re: Formula 233 rebuild
![]() by Picknasty Sat Oct 10, 2015 12:36 pm
by Picknasty Sat Oct 10, 2015 12:36 pm
Admin - Shine wrote: One way yo know for sure it to measure the thickness of the bottom where you have removed the 2 layers of roving.
......Not having to remove all the tabbing would be a huge time saver too.
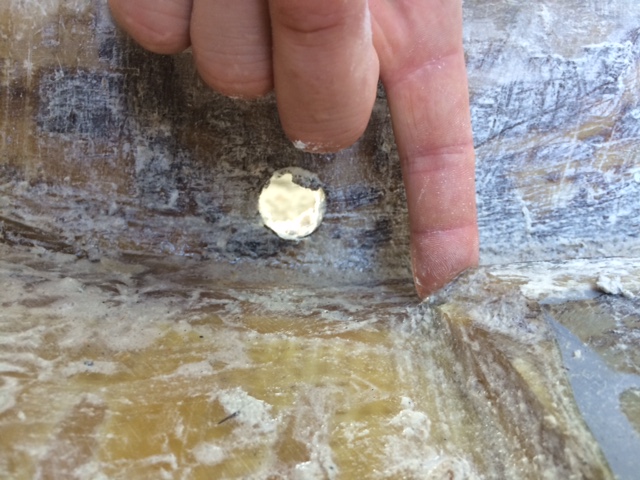
What would be your recommendation as the best way to measure the hull thickness? I also heavily agree after doing all that grinding and sanding that leaving the tabbing would be a massive savings in time. After cleaning the area shown above it seems that after they laid up the hull they added two layers of roven woven that ran the entire width of the hull without break (at least from what I've seen, I could very easily be wrong) followed by CSM and 4 inch tabbing of roven woven over the top of the stringers. Thus encapsulating the stringers in 3 layers of roven woven.
What I would like to do next is measure the hull thickness just to be sure and if you guys think its good to go then that'll be great, if not then I'll add what is deemed the appropriate amount. Also what would be a good way to decide if the base two layers of roven and CSM are bonded well enough to skip time in grinding down to that depth? Joel, I will be calling you in the next few weeks to place my order for my materials, just have one more job to finish and my starting budget will be ready to go. As always, thanks for input and knowledge.
Picknasty- Posts : 19
Join date : 2015-08-20
Re: Formula 233 rebuild
![]() by Admin - Shine Sat Oct 10, 2015 3:18 pm
by Admin - Shine Sat Oct 10, 2015 3:18 pm
Also what would be a good way to decide if the base two layers of roven and CSM are bonded well enough to skip time in grinding down to that depth?
If it peels, then it needs to come off. If you cant hit it on the edge with a scraper and peel it up, then its bonded very well. I think if you take just the tabbing off your fine, they really did a good job on these boats from what I can tell.
What I would like to do next is measure the hull thickness just to be sure and if you guys think its good to go then that'll be great, if not then I'll add what is deemed the appropriate amount.
thats exactly what I would do. you can drill a small hole and measure with the bit.
Joel, I will be calling you in the next few weeks to place my order for my materials, just have one more job to finish and my starting budget will be ready to go. As always, thanks for input and knowledge.
great ! We will be ready when you are
Admin - Shine- Admin
- Posts : 488
Join date : 2015-03-31 -
Page 1 of 2 • 1, 2 ![]()
» Aquasport 20 CCP rebuild
» Mako 17 rebuild
» Cobia Rebuild
» local Seacraft 23 rebuild